


One of the most common problems in photography regardless of which digital camera you use is what’s called ‘red eye’. No doubt you’ve seen this effect in your own or other people’s photos – the pupils of the person in the photo glow a bright red, which can prove a major distraction.
The red-eye effect is caused when a flash is used too close to a lens (and with compact cameras, this will always be the case) in low-light conditions. Never fear, though. There’s a very easy way to correct this annoying effect – here’s how.
Before you can begin, you’ll need a photo software program. In this guide, we’ve used the free Windows Photo Gallery. However, you’ll find that other programs such as Photoscape and Paint.net follow a very similar process.
You’ll need:
- a computer with Windows Photo Gallery installed
- any photos you would like to edit saved in a folder on your computer or to an external storage device.
Follow these step-by-step instructions to remove red eye
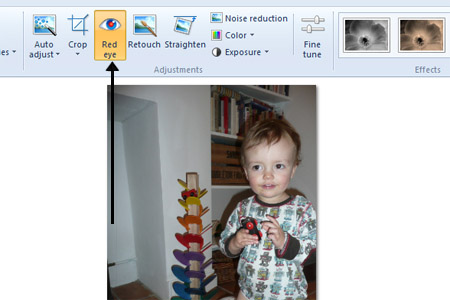
Step 1: Open Windows Photo Gallery and double-click the image you’d like to correct. This will open it.
Step 2: By default, when opening an image, you should automatically be brought into the ‘Edit’ tab, where you’ll notice a range of editing options along the top of your screen. If not, simply click Edit at the top of the screen to reveal these editing options. In the middle of them, you’ll see a button labelled ‘Red eye’. Click this.
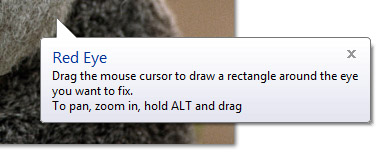
Step 3: A small pop-up box will appear instructing you to now drag your mouse pointer around the eye or eyes that you want to correct. As you move it over the photo, the pointer will first be a crosshairs and then, as you drag it, it will create a box round the part of the photo you want to deal with.
Step 4: With the box drawn over the person’s eyes, simply take your finger off your mouse and let Windows Photo Gallery take it from here. You’ll get a message saying that it’s ‘Applying’ your changes. This should take only a few seconds.
Step 5: It might not be obvious at first that anything has happened, especially if the person in your photo is quite small in the frame, so you can check. To do this, use the zoom feature in Windows Photo Gallery. In the bottom right of the screen is a slider. Drag this to the right to zoom in on your photo and make it bigger.
Step 6: You’ll probably find, after you zoom in, that you’re looking at a close-up of a button on the person’s shirt! If you press Alt on your keyboard, the pointer will become a small hand symbol. Keeping Alt pressed down, you can then use your mouse or touchpad to move around the enlarged photo and find the person’s eye.