


Having email on your iPhone and iPad is very convenient if you want to be able to check your email at any time. It means that you don’t have to wait until you’re at a computer to check your emails, saving you time and hassle, and you can read and reply to important mails as soon as they arrive in your in box. It is very easy to set up too!
What you’ll learn in this guide:
- How to set up an email account if you don’t already have one (Gmail, Outlook etc.) and get the login details
- How to find and open the iPhone or iPad email application
- How to use your sign in details to connect your email account to the iPhone or iPad email app
- Choosing what you want to synchronise
- Confirming your account and starting to use your email
- A brief overview of some of the main third party email apps
Follow these step by step instructions to install email on your iPhone or iPad
Step 1: Making sure you have an email account set up
First you will need the details of your email account. You will need your email address, e.g. yourname@gmail.com, as well as your password. If you do not have an email account, you will need to set one up. Go online and visit the site of the email provider you would like to use. Some of the most popular are www.gmail.com, www.outlook.com and www.yahoo.co.uk. Follow the instructions on the site and make note of your password. We recommend you make your password difficult to guess, including letters, numbers and symbols.
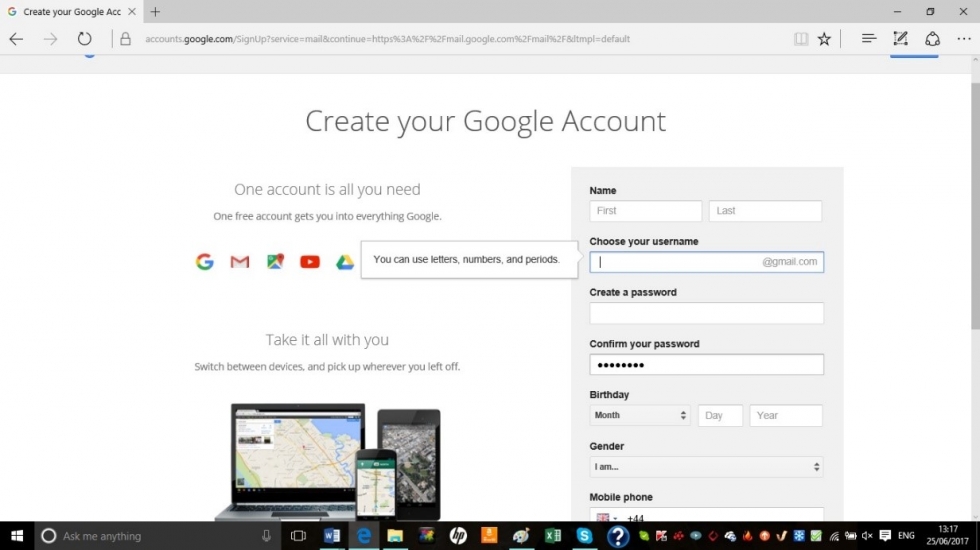
If you already have an email account but have forgotten your password, log out of your email account and click on ‘Forgot Password?’ This will prompt you to create a new password. Make a note of it before you go to install email on your iPhone.
Step 2: Connecting your email account to the iPhone email app
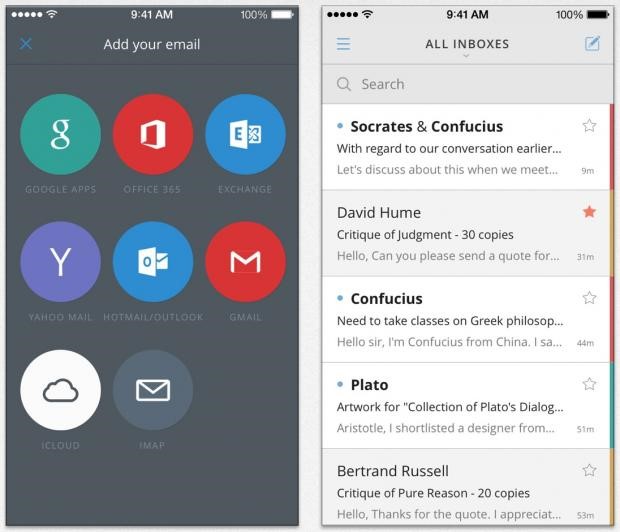
First, go to Settings > Mail > Accounts > Add Account.
If you are using an online email provider, such as Google or Outlook, you should see it in the list of email providers. Tap on it to add your account automatically.
Now type in your email address and password and tap ‘Next’. Mail will verify your account and you have email!
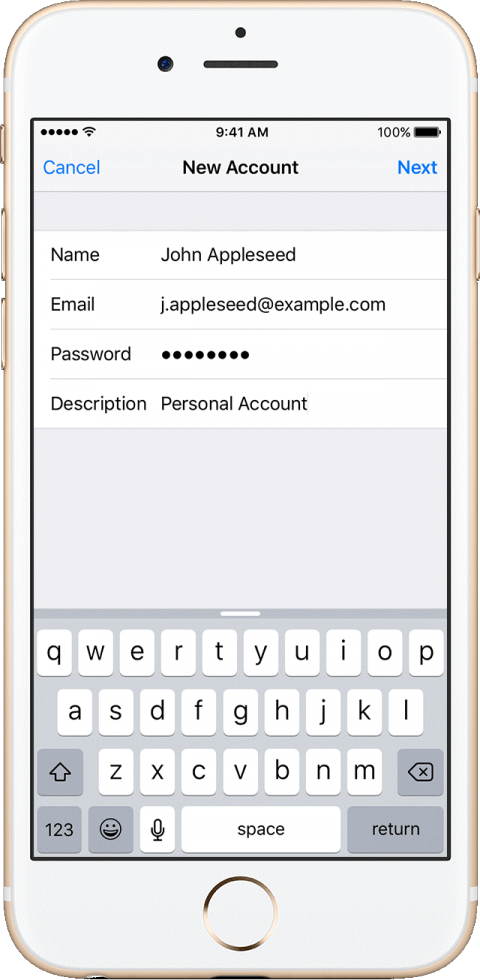
If your provider was not listed, you will need to set up your email manually. Tap Other > Add Mail Account. Input your name, email address, password and an account description then tap ‘Next’. Mail will search for your email settings to finish setting up the account. If it finds your account, tap on ‘Done’ to complete the process.
Step 3: Adding an account manually
If Mail cannot find your email account, you will need to enter them manually. First, type in your email address and password, then tap ‘Next’.
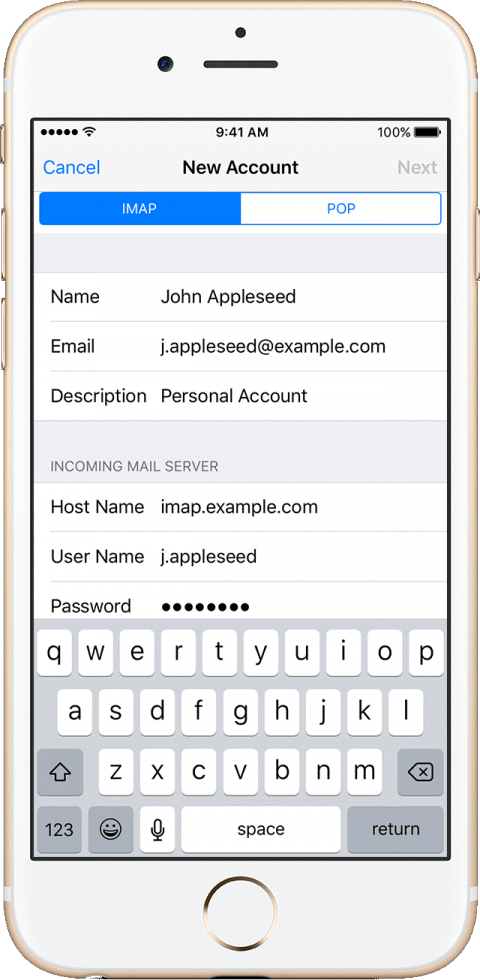
Now select either IMAP or POP for your account and enter the details for the Incoming and Outgoing Mail Server. If you do not know this information, contact your email provider.
Step 4: Confirming your details
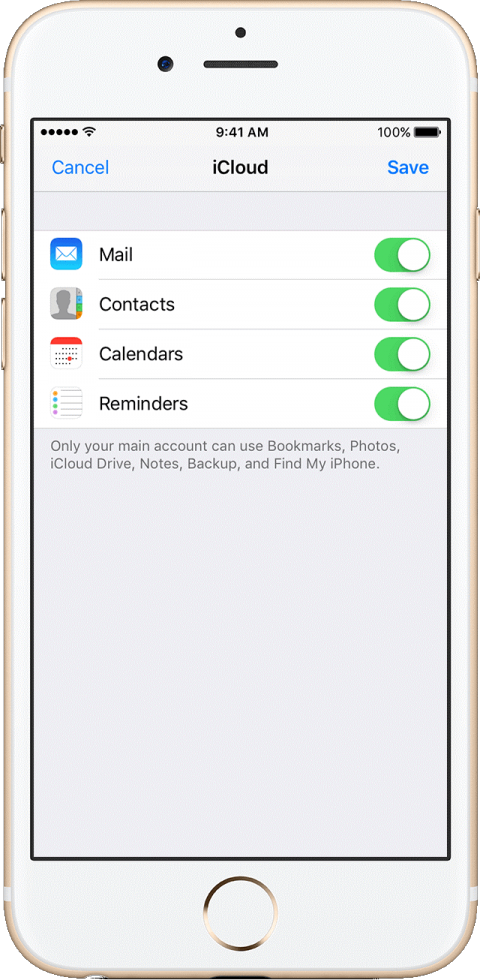
Once you’ve finished typing in all your details, you’ll be asked to confirm they’re correct. Tap ‘Save’ to finish or edit them if they are incorrect.
Now you can synchronise your content. Select what you want to sync and then tap on ‘Save’.
Step 5: Start using the app
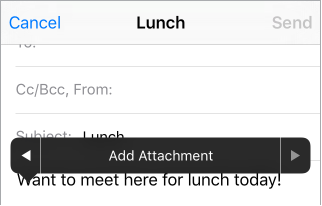
Now you’re ready to start using your email. To create a new mail from your Home screen, tap on Mail and then select ‘New Message’. If you’d like to add an attachment, double tap, then tap ‘Add Attachment’ and select the file you want. Adding a photo or video is the same process – double tap, then tap on ‘Insert Photo or Video’.
You can choose which account you send an email from by tapping the ‘From’ field and selecting the account you want to use. Once you’ve added recipients to your mail, you can change the order or drag them to the Cc or Bcc fields.
Step 6: Third party email apps
Although the iPhone default mail app is good, you might prefer the different functions offered by other third party email apps.
- If you use an online email provider such as Gmail or Outlook, you might want to install their specific app for your email for improved usage. Alternatively, you might to look for an app that offers the kind of functionality you like with your email.
- Mailbox allows you to swipe to carry out a command and comes with an extra 1GB of storage for your Dropbox when you install it. However, it’s only compatible with Gmail and iCloud.
- CloudMagic allows you to access all your email accounts in one inbox and is compatible with all the main email providers and IMAP accounts. It’s also fully integrated with apps such as Evernote and MailChimp, making it even easier to organise your email activity with your phone.
Now you can install and use email on your iPhone. You can choose to use your phone’s provided email app or you can install a specific email app for even more functionality.
Once you’ve mastered emailing from your phone, you might like to explore other ways to connect with your friends and family. You could install WhatsApp to send messages, group messages, photos, etc. You can even learn about video messaging and using FaceTime to stay in touch.